
Tuesday, November 8, 2011
Paper Flower Boquet
It amazes me what you can do with paper! With a little spritz here and a twist there you can turn plain card stock into a flowers
 I made this boquet for my daughter's birthday. Only four colors of cardstock were used : Very Vanille, Wisteria Wonder, Perfect Plum and Soft Suede.
..
I made this boquet for my daughter's birthday. Only four colors of cardstock were used : Very Vanille, Wisteria Wonder, Perfect Plum and Soft Suede.
..
Monday, November 7, 2011
Christmas Card Extravaganza - Day 3
Today the Cards for Christ group met and made more cards for our Christams sale. What an amazing group of ladies.
Here are a couple more cards for you.
 So many people have done a card like this using the "Come To Bethlem" stamp set. It is simple and quick.
Card Base: Whisper White 8 1/2 x 5 1/2
Layer 1 - Basic Black -5 x 3 3/4
Layer 2 - Whisper White - 4 3/4 x 3 1/2
Stamp Set: Come To Bethlehem
Ink: VersaMark
Other: Black embossing powder
..
So many people have done a card like this using the "Come To Bethlem" stamp set. It is simple and quick.
Card Base: Whisper White 8 1/2 x 5 1/2
Layer 1 - Basic Black -5 x 3 3/4
Layer 2 - Whisper White - 4 3/4 x 3 1/2
Stamp Set: Come To Bethlehem
Ink: VersaMark
Other: Black embossing powder
..
 I modified this punch art and turned it into a giftcard holder. I forgot to take a photo of the back, which isn't as cute as the front, but is still pretty good. That is where I made most of the changes
You need the following: Basic Black, Cherry Cobbler, Pumpkin Pie & Whisper White card stock, the Top Note die,an office punch, the 1/2 inch circle and the 1 3/4" scallop punches, a jeweled brad, and 1/2" scallop dot cherry cobbler ribbon .
I modified this punch art and turned it into a giftcard holder. I forgot to take a photo of the back, which isn't as cute as the front, but is still pretty good. That is where I made most of the changes
You need the following: Basic Black, Cherry Cobbler, Pumpkin Pie & Whisper White card stock, the Top Note die,an office punch, the 1/2 inch circle and the 1 3/4" scallop punches, a jeweled brad, and 1/2" scallop dot cherry cobbler ribbon .


Monday, October 31, 2011
Christmas Card Extravaganza - Day #2
I hope you are having a wonderful day!!
This is the 4th card in a series I am doing. Remember that all measurements are in inches.

Mary Fish showed how to do a double Z fold card on her web site. This gave me the idea for this card. I think the angel from the "Angelic Joy" stamp set (2010 Holiday Mini) has found the perfect home.
Base: Cherry Cobbler 12 x 5 1/2, Score at 2,4,8,10
Belly Band: Whisper White 11 x 1 1/2
For angel: Whisper White 2 1/2 x 4
Stamps: Angelic Joy
Ink: Cherry Cobbler, StazOn Black
Embossing Folders: Perfect Polka Dots, Snow Burst
Other: Aqua Painter,Shimmer Paint - Frost White & Champagne Mist, Spone Dauber or applicator
Card # 5
I couldn't resist Sandi McIver's easel card using "Snow Much Fun". I did make a few cahnges by leaving off a bow and adding a punched label so people could sign the card.

I used Night Quite Navy and Pear Pizzaz card stock and Not Quite Navy Designer Series Paper (DSP)
Base: Not Quite Navy 4x 8, scored at 2 and 4.
Layers: Pear Pizzaz - 2 pieces - 3 3/4 x 1 3/4
DSP 3 1/2 x 1 1/2
Not Quite Navy 5 1/2 x 2 1/2, Pear Pizazz 5 1/4 x 2 1/4, Whisper White 5 x 2 ( For image piece.
Scraps of the green and white for the punches.
Ink: Real Red, Black Stazon, Not Quite Navy,Peach Parfait
Punches: 1 3/4, 1 1/2 circles
Other: Aqua Painter
Sunday, October 30, 2011
Christmas Card Extravaganza - Day 1
It is hard to believe that is has been so long since I have posted anything. Life just overtook me for a while. SO, to make up for not posting I am going to show you multiple cards/projects for the next couple of days. Some are originals and others are cards I saw online and fell in love with.
Card #1

This a a slight variation of a card that I saw sometime in the past. I am sorry I cannot remeber the name of the original creator..
Base: Cherry Cobbler
Layers: Whisper White: 4 1/4 x 4 (All measurements will be in inches)
Old Olive: 4 1/4 x 1 1/2
Cherry Cobbler: 2 1/2 square & White 2 1/2 square.
Cherry Cobbler: 2 1/2 x 1
Stamp Sets: Tags Til Christmas, Teen Tiny Wisher, Bells & Biughs
Punch: Ornament, Word Window, Modern Label, Pinking Hearts Border
Ink: Cherry Cobbler, Old Olive
Card #2
 I loved making this card, because it is so simple. The only thing is that it drives some people crazy when they are making it, because I used 1/8" measurements. On some cutter designs it is difficult to find some of the measurements.
Base: Cherry Cobbler (11 X 4 1/4; Score - 5 1/2)
Layers: Whisper White: 5 x 3 3/4
Cherry Cobbler: 4 715/16 x 3 53/4
Whisper White: 3 1/8 x 4 3/8
Stamps: Welcome Christmas
Ribbon: 1/2" Scallop Dots - Cherry Cobbler
Other: VersaMark Ink and Black Embossing Powder
Card # 3

This is another fast card, but one that really looks rich when you see it. This is a great card when you are making a "bunch" to send to family & friends.
Base: Night of Navy
Layers: Silver Paper: 5 1/8 x 3 7/8
Nightof Navy: 5 x 3 3/4
Stamps: Scenic Season
Ribbon: 3/8" White Taffeta: 6"
Other: VeraMark Inl and silver embossing powder
Card #1

This a a slight variation of a card that I saw sometime in the past. I am sorry I cannot remeber the name of the original creator..
Base: Cherry Cobbler
Layers: Whisper White: 4 1/4 x 4 (All measurements will be in inches)
Old Olive: 4 1/4 x 1 1/2
Cherry Cobbler: 2 1/2 square & White 2 1/2 square.
Cherry Cobbler: 2 1/2 x 1
Stamp Sets: Tags Til Christmas, Teen Tiny Wisher, Bells & Biughs
Punch: Ornament, Word Window, Modern Label, Pinking Hearts Border
Ink: Cherry Cobbler, Old Olive
Card #2

Base: Cherry Cobbler (11 X 4 1/4; Score - 5 1/2)
Layers: Whisper White: 5 x 3 3/4
Cherry Cobbler: 4 715/16 x 3 53/4
Whisper White: 3 1/8 x 4 3/8
Stamps: Welcome Christmas
Ribbon: 1/2" Scallop Dots - Cherry Cobbler
Other: VersaMark Ink and Black Embossing Powder
Card # 3

This is another fast card, but one that really looks rich when you see it. This is a great card when you are making a "bunch" to send to family & friends.
Base: Night of Navy
Layers: Silver Paper: 5 1/8 x 3 7/8
Nightof Navy: 5 x 3 3/4
Stamps: Scenic Season
Ribbon: 3/8" White Taffeta: 6"
Other: VeraMark Inl and silver embossing powder
Thursday, July 14, 2011
Faithbooking Psalm 139: 9-10
A couple of years back I became very ill and I began to think about all of those things I always intended to do, but had put off. One of my greatest worries was that I had not told my children how great God is. So, I decided to make a Faith Book to witness to a loving God who never abandons us.
Below are 2 pages that were inspired by scripture and the wonderful Designer Series Paper, Nautical Expedition. The paper is in the Summer Mini Catalog.
Page 1

Page 2

Supplies:
Paper: Marina Mist 12 x 12, Nautical Expedition, Whisper WhiteScraps
Ink: Basic Gray, Marina Mist, VersaMark
Stamp Set: The Open Sea
Other: Marina Mist Stampin'Write Marker, Silver Embossing Powder,
Heat Tool, Silver Brads
I am so sorry the company did not carry the DSP Nautical Expedition forward into the new big catalog. So, if you are like me and you have fallen in love with this paper you need to order it before the end of August .
Remember, you are always in His care!
Wednesday, July 13, 2011
Blossom Bouquet Card
In addition to making this card for a friend, I had two goals. First, try out the new Blossom Bouquet Punch and, secondly, use up some of my scraps of paper. That is what is great about punches. They allow you to use those small pieces of left over paper to create additional elements for your card design.

Supplies:
Paper: Marina Mist- 8 1/2" x 3 1/2",plus a 1 1/2" x 4 1/4" scrap;
Beyond the Garden Designer Series Paper 8 1/2" x 5 1/2";
Whisper White 5 1/2" x 4 1/4" (for inside), 1" x 4 1/4"
Punches: Blossom Bouquet , Bird Builder, Scallop Edge
Ink: Marina Mist
Other: Snail Adhesive, Dimensionals, 1/4"satin ribbon, gem stone
Tuesday, July 12, 2011
Happiest Birthday Wishes Card
I just had to try as many of the items from the new Idea Book and Catalog as possible on a single card. I managed to use 5. Not too bad!

SUPPLIES:
Paper: Island Indigo- 8 1/2" x 5 1/2", Melon Mambo scraps, Beyond The Garden Designer Seris Paper.
Ink: Islad Indigo
Stamps: Happiest Birthday Wishes
Other: Lace Ribbon Border Punch, 1 3/4" Scallop Circle Punch, 2 3/8" ScallopCirclePunch, 2" Circle Punch,Stripes Embossing Folder, gemstones
I hope you have a great day!
Monday, July 11, 2011
Fabulous Floret Birthday Card
Whew! I am so glad that my stamps form the 2011- 2012 Idea Book and Catalog have arrived. I need Birthday Cards for my friends. So, for the next several day that is what you are going to see!
 Supplies:
1. Card Stock: Bashful Blue- 4 1/4" x 11", 4 1/4" x 2 1/2", 2 1/2" square for punched shape, Whisper White - 3 5/8" x 2"
2. Stamp Sets: Fabulous Florets, Create
A Cup Cake
3. Ink: Bashful Blue, Certainly Celery, Versa Mark
4.Other: Scallop Oval Punch, white embossing powder,
heat tool, Snail adhesive
Tuesday, July 5, 2011
The Open Sea Thank You
I hope all of you had a wonderful 4th of July. My family participated in our community's parade. Our veterans were being honored. So, my husband rode in the parade and the rest of the family cheered him on from the sidelines.
I cannot believe how many thank you cards I need to mail out! I am always behind. I need to start making them in massive amounts and have them on hand. The one below was made for the director of the Museum of the Pacific War. He helped my granddaughter with a school project.
 Materials:
Paper Early Espresso- 8 1/2" x 5 1/2", Nautical Expedition DSP, Marina Mist -14- 3/4" circles
Ink: Early Espresso, Bashful Blue
Stamps: Curly Cote, The Open Sea
Punches: 3/4" Circle, 2 1/2" Circle
Other: Snail Adhesive, Antique Brads
I cannot believe how many thank you cards I need to mail out! I am always behind. I need to start making them in massive amounts and have them on hand. The one below was made for the director of the Museum of the Pacific War. He helped my granddaughter with a school project.

Paper Early Espresso- 8 1/2" x 5 1/2", Nautical Expedition DSP, Marina Mist -14- 3/4" circles
Ink: Early Espresso, Bashful Blue
Stamps: Curly Cote, The Open Sea
Punches: 3/4" Circle, 2 1/2" Circle
Other: Snail Adhesive, Antique Brads
Friday, July 1, 2011
On The Grow Thank You Card
The Summer Mini Catalog is full of what I think are great deals. For example, the stamp set on The Grow has 4 separate stamps that can work in all kinds of combinations for the low cost of $11.95 for the clear mounted or $ 15.95 for a wood mounted set. This means that the cost of each is either $2.98- $3.99 per stamp.
In addition, this set is just FUN.

Materials:
Paper Pink Pirouette - 5 1/2" x 8 1/2" , Crumb Cake 4 1/4" x 2 3/4", Whisper White - 4" x 2 1/2".
Stamp Sets: On The Grow, Thank You Kindly
Ink:Pretty In Pink, Wild Wasabi, Marina Mist, Basic Black
Other Framed Tulips Embossing Folder, Aqua Painter, Snail
Adhesive.
I pray that God gives you beautiful surprises today!
Thursday, June 30, 2011
Sail Away Masculine Card
Ok - Here is my "favorite" single stamp in the summer mini. I will show you more examples of what you can do with this 1 stamp next week.

Materials:
Cardstock: Early Espresso - 5 1/2" x 8 1/2", Crumb Cake- 4 1/4" x 2 3/4", Whisper White- 4" x 2/12".
Stamp: Sail Away
Ink: Early Espresso
Other: Snail Adhesive, Square Lattice Embossing Folder, Hemp Twine, Dimensionals, Sponge Dauber,and Paper Piercing Tool.
I hope all of you have a wonderful day! If I can help you with ideas, classes, supplies, retreats, etc. just let me know
Tuesday, June 28, 2011
Proud Peacock
One of my favorite color combinations are aquas and certain shades of green. So,I like looking at this card and I pray that when I send it to someone the recipient will also enjoy it.
 Click To Enlarge
Materials:
Papers Tempting Turquoise - 4 1/4" x 11" folded at 2 3/4"& 8 1/4", Pear Pizzaz- 3" x 3" Scalloped Square, Crumb Cake- 4 1/4" x 2 3/4", Whisper White - 4" x 2 1/2".
Stamp Set Proud Peacock
Ink Crumb Cake, Old Olive - Classic Ink Pads and Stampin' Write Markers
Ribbon 1/4" Old Olive Grosgrain Ribbon
Other Bigz Die - Scallop Squares Duo, PerfectPolka Dots Embossing Folder, Snail Adhesive.
Saturday, June 25, 2011
The Open Sea Card
One on the things I like most about Summer Mini 2011 is the great stamps that can be used to create masculine cards. I made sure Cheri had a couple of masculine cards to send to her male volunteers when the occassion arose.
 Click To Enlarge
Materials:
Paper: Early Espresso- 8 1/2" x 5 1/2", Tempting Turquoise- 4 1/2" X 3", Crumb Cake - 4 1/4" X 2 3/4 , 2 1/2" circle and Whisper White - 4" X 2 1/2" card stock
Stamp Sets: The Open Sea,Teeny Tiny Wishes
Ink: Early Espresso,Bashful Blue, Tempting Turquoise
Punch 2 1/2" Circle
Other Sponge Dauber, Snail Adhesive
This card takes minutes to make. There are a lot of ways that you could "step it up" to make it really WOW card. JUST IMAGINE!
Have a fun and safe weekend! If I can ever help you just leave a comment and I will e-mail you.
Friday, June 24, 2011
Flower Fest Thinking of You Card
If you haven't taken a look at the the current Summer Minin Catalog be sure to click on the link to the left and check it out. It is one of my favorites. There are great stamps and papers for the guys as well as for the gals. For the next few days I will show you simple cards that can be made for all knids of occassions. The first ones I am going to show you were made as a thank you gift for my friend Cheri. She made a three month supply of my husband's favorite pecan bars so that he would have them while he was going through radiation. She is a volunteer coordinator for our Good Samaritan Clinic and is always in need of thank you & thinking of you notes.
 Click To Enlarge
Materials:
Papers: Pink Pirouette 8 1/2 X 5 1/5"
Crumb Cake 4 1/4 X 2 3/4"
Whisper White 4 X 2 1/2"
Stamp Sets: Flower Fest and hostess Apple Blossoms
Inks: So Saffron, Marina Mist, Pretty in Pink and Regal Rose, Crum Cake
Other: White satin ribbon stained with Crumb Cake Ink and gem stones.
If you have any questions just leave a comment and I will be glad to help you .
Have a wonderful day and may God bless you in all ways.
Friday, May 13, 2011
Breast Cancer Fund Raiser - Strength & Hope
If you have been checking my blog, you know that I have not posted in a month. We had the death of a very dear sister due to cancer.
As it turns out Stampin'Up is raising money for the Breast Cancer Research Foundation. They have created a beautiful stamp set called "Strength & Hope". The card below was made from it. The company will donate $2 for every set sold. And I will give what I make from the sales of this set to our Brune Cancer Center here in Fredericksburg.
So, this stamp set is a good investment in two ways. First, it helps in our fight against breast cancer. Secondly, it is a beautiful and versatile set that you will be able to use many times over.
Please forward this post to as many people as you can. The more of the stamp sets we sell the more we can fight this terrible disease!

All of the images,except for the "thank you", are from Strenght & Hope stamp set. The "thank you" is from Teeny Tiny Wishes".
Tuesday, April 5, 2011
Easter Bunny Gift Box
This afternoon I had to go to the dentist and there, hanging on the door, was the cutest set of bunnies all dressed up for Easter. They were so cute they inspired the 5" x 4" gift box below.
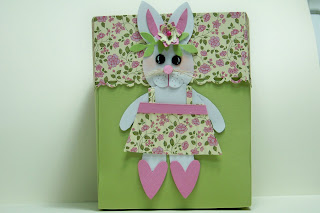
Punches for the bunny: 1/4", 1/2", 1 3/4", 2 x 1 38", circles, Two-Step Bird, 1 3/8" x 5/8" Oval, Heart to Heart, Boho Blossoms, Build a Blosson and the Scallop Trim Border punches.
Cardstock :Whisper White, Basic Black, Regal Rose,Certainly Celery card stock, and Spring Time Vintage Designer Series Paper
Other: Crimper, Pink mini brad, uni-ball Signo Gel Pen, Linen Thread, Sticky Strip
I enjoy looking at my bunny, even though she is not perfect. I ran out of sticky strip and didn't cut a straight edge, but for my first prototype I am pleased. I'll make a few changes when I make her "sister".
Gee, who would have thought that inspiration could be found at the dentist's office.
Monday, April 4, 2011
Four Frames Easter Card
I kept thinking about my mom today. She has been gone for a long time, losing a fight with cancer. So I decided to make a card in her memory. She loved purple and she had one of the greenest thumbs around. She had a real knack for growing climbing roses.
This card also features one of the sneak peak stamps from the Idea Book and Catalog for 2011-2012.

Materials>
Card Stock: Perfect Plum for the card base (8 1/2" x 5 1/2") and enough to punch 2 decorative lables; Very Vanilla (3 3/4" x 5") and enough to punch 1 decorative label; Basic Black (4" x 5 1/4") and enough for 2 labels.
Stamp Sets : Elements of Style and Four Fames,Teeny Tiny Wishes
Punch: Decorative Label
Ink: Perfect Plum, Basic Black, Old Olive, So Saffron
Other: 1/4" Basic Black Grosgrain Ribbon, Beautiful Wing Embosslit die, dimensionals, aqua painter
Putting It Together: Center and adhere the black rectangular piece to the Perfect Plum card base. Stamp roses in plum ink on the top left of the vanilla card stock. Use the aqua painter to pick up Perfect Plum ink and color wash flowers. Also, use it to paint leave in Old Olive in the same manner. Color center of flowers with So Saffron. Sponge Perfect Plum around the Very Vanilla panel. Using the die, cut out butterfies and attach 2 as show in the photo. Attach ribbon and bow.
Stamp floral frame in Perfect Plum and color as you did the flowers on the Very Vanilla panel. Stamp the sentiment in the center of the frame and then punch it out with the Decorative Label punch.
Punch out 2 Perfect Plum labels. Cut one in the middle horizontally and the other vertically. Cut and splice to form a border frame around the floral frame. Repeat the process with the black paper to form a second frame behind the plum one. Use dimensionals to attach frames over the ribbon.
Visit my web page to learn all about getting those wonderful frame stamps that work with thte Decorative Label punch www.sharonmassey.stampinup.net
Sunday, April 3, 2011
Big Bird Punch Art
The last time I bolgged I told you that I loved the Build a Blossom Punch and stamp set - versatility, versatility, versatility! My 22 month old grandson got sick and I wanted to take him a get well gift. AND - once again out came the Build A Blossom duo. He loves Sesame Street and the punch was perfect for making Big Bird.

Inside the folded card stock is a small cello bag filled with Skittles.

I really think this turned out cute - even my Marine described it as "cute" and that is not a word often found in his vocabulary. I also think this would make a wonderful party favor for a toddler's birthday party!
I wish you could have seen my grandson's eyes eyes light up. And isn't that what paper crafting all about - Making somebody happy with something you made.
I hope all of you have a blessed week!
Thursday, March 31, 2011
Build a Blossom
Today was the first time I got to play with my new punch and its partner Build A Blossom stamp set. I really believe this is one of the most versatile stamp sets I have seen. You can do all kinds of things with it - from vintage to elegant to just plain silly. My goal for my next several blogs is to see what I can come up with using this punch and stamp set.
Here is my first one:

I used the jumbo wheel stamp "Friendly Words" inked with So Saffron ink to create a light background on a 5" x 3 3/4" piece of Very Vanills Cardstock
I then used the flourish stamp from the "Elements of Style" stamp set inked in Not Quite Nave to stamp over the background. Then I attached a piece of 3/8" Not Quite Navy taffeta ribbon to this panel
Once that was done I stamped Very Vanilla card stock with the largest. petals in So Saffron, after stamping off. Then I just punched them out. The smaller petals were punched out of Very Vanilla and sponged with So Saffron ink. I assembled the petals to form a flower, adhering them to
each other with glue dots. A yellow rhinestone was glued to the center of the flower. The flower was then glued to the left side of the above panel
"Friends" and a flourish from the "Tiny Tags" stamp set was stamped in Not Quite Navy on Very Vanilla card stock. These were punched out Jewelry Tag punch. A piercing tool was used to make a hole in the top of each tag. Linen thread was run through the hole and tied to the ribbon.
Finally this panel was attached to a Not Quite Navy card base, 5 1/2" x 4 1/4".
Whew! I sure hope this makes sense.
I can hardly wait to try something totally different tomorrow.
Wednesday, March 30, 2011
SImple Card with Trendy Trees
Do you ever feel overwhelmed and a bit lost? Well, that would have described me for the last couple of weeks. There have been family members with health issues and big occassions and I just couldn't keep up. Hopefully, things will slow down and I will be back to card making.
The card I am going to show you is really simple. I will have to guess on the exact measurements, because the card was made, photographed and sent to a friend. Opps! I forgot to measure in the rush.
Materials: 1. Whisper White cardstock measuring 5 1/2" x 8 1/2" scoring and folding at 4 1/4" and 1 3/4" x 1 3/4", Pink Pirouette cardstock - 2 1/4" x 2 1/4" and 4 1/4" x 1"; Certainly Celery - 2" x2" and 4 1/4" .
2. Certainly Celery, Wild Wasabi, and Soft Suede classic ink
3. Trendy Trees and Sincere Salutations stamp sets.
4. Scallop Edge Border Punch
5. StamStamp-a-ma-jig
6. Melon Mambo Stampin' Write marker
7. Perfect Polka Dots Embossing Folder & Big Shot
I think you can put this card just by looking at the picture. The only thing that might need some explanation is the focal piece. Just stamp the leaves from the stamp set a little below the center in Certainly Celery. Then restamp the leaves in Wild Wasabi so that they are slightly to the right or left of the first stamped image. Draw in flowers with the Stampin'Write marker. Finally, stamp the tree trunk in the appropriate position. I used the Stamp-a-ma-jig to make sure I got it where I wanted it.
The front of the white card was embossed 3/4 of the way down.
Have a great day!
The card I am going to show you is really simple. I will have to guess on the exact measurements, because the card was made, photographed and sent to a friend. Opps! I forgot to measure in the rush.

Materials: 1. Whisper White cardstock measuring 5 1/2" x 8 1/2" scoring and folding at 4 1/4" and 1 3/4" x 1 3/4", Pink Pirouette cardstock - 2 1/4" x 2 1/4" and 4 1/4" x 1"; Certainly Celery - 2" x2" and 4 1/4" .
2. Certainly Celery, Wild Wasabi, and Soft Suede classic ink
3. Trendy Trees and Sincere Salutations stamp sets.
4. Scallop Edge Border Punch
5. StamStamp-a-ma-jig
6. Melon Mambo Stampin' Write marker
7. Perfect Polka Dots Embossing Folder & Big Shot
I think you can put this card just by looking at the picture. The only thing that might need some explanation is the focal piece. Just stamp the leaves from the stamp set a little below the center in Certainly Celery. Then restamp the leaves in Wild Wasabi so that they are slightly to the right or left of the first stamped image. Draw in flowers with the Stampin'Write marker. Finally, stamp the tree trunk in the appropriate position. I used the Stamp-a-ma-jig to make sure I got it where I wanted it.
The front of the white card was embossed 3/4 of the way down.
Have a great day!
Friday, March 11, 2011
All Occassion "For You" Card
This card just evolved. I started out trying to do one thing, but ended up with something totally different from what I had envisioned.
 Click To Enlarge
Materials: 1. 5 1/2" x 8 1/4" Crumb Cake card stock, scored and folded at
4 1/4" to form a top fold card and two 3"x 3" Crumb Cake
squares.
2. 5 1/2" x 2 1/4" Not Quite Navy card stock.
3. 1 3/4" and 2" circle punches.
4. Two pieces of 1/8" Marina Mist Taffeta Ribbon, one measuring 4 "and the
other 1 1/2".
5. "Aviary" and "One of a Kind" stamp sets
6. Poppy Parade and Soft Suede Stampin' Write markers and Classic
Ink Pads.
Form the Crumb Cake card base. Punch a 1 3/4" circle on the right side of the Not Quite Navy strip. Glue the ribbon so that it goes to the center of each side of the circle. Tuck ribbons to the back of the card stock and glue.
Stamp the small bird in Poppy Parade on the center of the lower third of the 3" x 3" piece of Crumb Cake. Then stamp the cage over the bird in Soft Suede. Use the Poppy marker to darken the bird and the Soft Suede marker to draw in the cord holding the cage. Sponge Not Quite Navy around the cage. Adhere this square behind he punched out circle so that it is centered. Punch out a 2" Crumb Cake Circle. Then punch out the center of this circle with the 1 3/4" circle Punch. You will end up with a frame to go around your caged bird's window. Finally, stamp the large bird in Poppy Red and Soft Suede, the second bird in Not Quite Navy and Soft Suede and the sentiment in Not Quite Navy at the bottom of the card..
Thursday, March 10, 2011
Friendship Card
I have a great friend who has recently returned from a month long trip to the Texas Valley and Mexico. When she came home she was bearing gifts - yummy tamales, grapefruit and a great yellow leather purse. Wow! Talk about being spoiled!!! And I am proud to say I shared everything with my husband, except for the yellow purse. Anyway, the card below is my thank you card to her. However, I am contemplating how I can repay her in the future. I am sure you will see what I come up with, because her gifts will be handmade.
 Click To Enlarge
Materials: 1. 8 1/2" x 5 1/2" Whisper White Card stock, scored and folded
4 1/4"; 5 1/2" x 1 1/4" and 2' x2" Whisper White Card stock.
2. 5 1/2" x 1 1/2" and 2" x 2" Real Read card stock.
3. Small scrap of Old Olive DSP
4. Inks: Real Red and Wild Wasabi (Stampin' Write Markers)
5. Other: Perfect Polka Dots embossing folder, Friendly Words
Jumbo Wheel, corner punch, 1 3/4" Scallop punch, 1 1/4"
Circle Punch, Two-Step Bird Punch, sanil adhesive and
dimensionals, Tart & Tangy stampset., Real Red 3/8" taffeta
ribbon.
Making this card is fairly quick. Take the white card base and use the
Perfect Polka Dot folder to emboss it. Round the corners with the corner punch. Ink the Friendly Words wheel with Real Red ink and run it across the strip of white paper. Center and adhere a piece of Real Red 3/8" taffeta ribbon. Then mount this piece in the center of the red strip. Adhere this combo to the center of the card base. Punch out a scalloped circle from the 2" x 2" red paper. Use the markers to ink the cherry stamp, except for the leaves, and then punch it out with the circle punch. Use the Two-Step Bird punch to punch out leaves from the DSP paper. Attach the leaves tothe top of the cherry stamp. Glue the cherry piece to the scallop and attach the finished piece the Friendly Words piece.
Wow! I hope this makes sense. I am in a rush to make an appointment. So, pleaase forgive any errors.
Wednesday, March 9, 2011
Inspiration
This card was made for my 10 year old grandson, because I am so very proud of him. He fasted for 30 hours to raise money for World Vision. Right now he is truly an inspriation to me, because he is doing exactly what we all are called to do - sacrifice for the good of others .
 Click To Enlarge
This card just takes a few minutes to make. The base is the standard 8 1/2" x 5 1/2", scored and folded at 4 1/4", in Sahara Sand card stock.
A 2 1/2" x 5 1/2" piece of Early Espresso DSP was glued on the bottom of the card front. A 5 1/2" piece of Early Espresso was punched with the Dotted Scallop Ribbon Border. The result was adhered to the top of the DSP. The definition of inspire was stamped on the top, right of the Sahara Sand. This sentiment came from the "Define Your Life" stamp set.
A 2 5/8" scallop was punched out of Early Espresso. A 2" circle was punched out of Crumb Cake. The owl from the "Punch Bunch", which is in the "sale.a.bration" catalog, was stamped on the Crumb Cake circle. This circle was glued onto the scallop and then embossed with the "Square Lattice" folder.
Where ever you are I hope that your days are blessed and filled with much happiness.
Tuesday, March 8, 2011
Learning To Think Out of The Box
I love looking at cards that other people have made and one of the things I have observed is that that most creative card makers think out of the box. They look at a product and think of as many different ways to use it as possible. Lately I have seen multiple people turn the oval punches into vases. Stampin Addicts showed a technique of inking acrylic blocks and stamping directly onto card stock to add texture or color. So I tried both of these techniques on this card:

Click To Enlarge
First, I formed a 5 1/2" x 4 1/4" card base out of Very Vanilla card stock.
The second layer is Baja Breeze and measures 5 1/4"x 4". I embossed it with the Elegant Lines folder and attached it to the center of the card base.
The third layer is a piece of Very Vanilla, 4 3/4" x 2 1/2". I placed an acrylic block on a Baja Breeze ink pad and then stamped the block directly onto the Very Vanilla panel. Then I sponged the ink around the edges.
Next I colored the flowers from the Nature Walk stamp set with the Riding Hood Red and Garden Green Stampin' Write markers and stamped them in the top middle of the panel. I repeated this 2 more times. Then I used the Regal Rose anad Garden Green markers to color the berry stem from the Autumn Days stamp set and stamped it among the flowers.
I used the 2" x 1 3/8" oval punch to form a Baja Breeze oval and snipped off the ends to form the vase. I painted it with Frost Whie Shimmer Paint to give the vase a look of frosted glass. I used dimensionals to attach the vase over my flowers.
Finally, I added Basic Pearls to the vase and the embossed Baja Breeze.
Try to think of multiple ways to use your Stampin'Up products. You can come up with some cool looks and make your investment really pay off.
Beautiful Butterflies
Wow! I just got my "Beautiful Wings"embosslit die and had to try it out. I absolutely love it. It cuts and embosses 5 butterflies, the distance bewteen wing tips range from 5/8" to 1 7/8". I put 2 on the outside and 3 on the inside.

Click To Enlarge
I formed a Pink Pirouette card base. I cut out a piece of Basic Gray card stock and adhered a piece of 1/8" Pretty in Pink Taffeta ribbon 1 3/4" from the top and a second one 1 1/2" from thte bottom. The I centered and attached this panel to the pink card base.
Then I stamped the Fifth Avenue Floral stamp set rose in Basic Black ink on the top part of my Very Vanilla card stock. I stamped a second rose onto a sheet of copy paper, cut it out, and used it as a mask. I then stamped the lily from the same stamp set on the bottom of the vanilla card base, making sure part of it overlapped the rose. I created a mask for the lily. I coverd both the rose and the lily with their masks. Finally,I stamped the last flower from the set between the rose and lily.
I colored the rose with Pink Pirouette and Pretty In Pink inks and the lily with Melon Mambo, Peach Parfait and Basic Black. I cut the flowers out on the right side only and then attached the resulting piece on the top left of the gray panel.
I cut the butterflies out of Whisper White scraps with the embosslit and sponged them with Pretty In Pink ink .
I punched out 1 3/8" x 5/8' oval in the Pink Pirouette and stamped my sentiment on it. I dotted a border around the oval. Then I placed the oval between the ribbons.
Materials:
5 1/2" x 8 1/2 " Pink Pirouette card stock scored and folded at 4 1/4", plus a 2" x 1" for punch
3 1/2" x 4 3/4" Basic Gray card stock
2" x 4" & 2 1/4" x 2 1/4" Very Vanilla Card stock
2 - 4" pieces of 1/8" Pretty In Pink taffeta ribbon
Basic Black, Mellon Mambo, Pretty In Pink, Pink Pirouette, Peach Parfait and So Saffron Inks.
Beautiful Wings embosslit
1 3/8" x 5/8" Oval Punch
Sunday, March 6, 2011
Amazing Ink
I love ink. Before I discovered Stampin'Up's ink I had almost every brand you can think of - at least 8 or 9 different brands. But what I have learned in the 8 months of using Stampin'Up products, is that their product can do everything the others can do. There is no need to buy so many different kinds of ink. The advantage of Stampin'Up is the graduation of shades for each color family. It allows you to blend colors in the most beautiful ways. The card below is the result of working from yellow to darker shades orange:

Click To Enlarge
I started out with a 3 1/2"x 3 1/2" piece of Whisper White card stock.
I brayered it with a light coat of So Saffron ink. Then I brayerd a light coat of Peach Parfait ink on all of the panel, except for the top left corner. Finally I brayered Pumkin Pie ink on the right side of the panel.
I then stamped the palm tree from the Plant Hope stamp set on the left side of the panel. Using the Basic Black Stampin'Write marker I colored in the trunk and spines of the palm leaves and drew 2 birds to the right of the tree. I sponged Basic Black ink at the bottom of the panel to represent the ground and used the black marker to draw in blades of grass. I stamped the sentiment from the Teeny Tiny Wishes stamp set on the right side. Finally I used the uni-ball Signo Gel Pen to hilite the trunk and leaves.
I know I have seen a card similar to this some where on line, but cannot remember where. I am so sorry!!!!
Saturday, March 5, 2011
Color Coordination Love
One of the things I like the most about Stampin' Up produts is the color coordination. I used to spend what seemed like hours trying to find paper, card stock, ink, and ribbons that would match. With Stampin'Up products I don'thave to worry about that any more. The company has done all the work for me. YEA! What a time saver!!! You can see how exactly they match their colors in the card below.
 Click To Enlarge
I simply brayered a piece of 3 1/2" x 3 1/2" Whisper White with So Saffron and then stamped the palm (Plant Hope stamp set) in Basic Black.
I mounted this panel on a piece of Basic Black card stock, 3 3/4 "x 3 3/4", which was then adhered on the top 2/3's of the So Saffron card base. The final touch was punching a small strip of the black card stock with the "Pinking Hearts Border" punch and adhering it 1/2" below the panel.
I don't know about you, but I think that it is very difficult to tell the brayered yellow from the yellow card stock. Stampin'Up products are truly color coordinated!
Thursday, March 3, 2011
Stamp, Sponge, Brayer and a Water Color Video
Before I show you my next efforts I have a request to make. Please keep Kerry in your prayers. He is a 20 year old dance instructor who has stage 4 brain cancer. He is such a delight, but is really having a hard time. Also, pray for his mom who is his primary care giver. She is so tired and her heart is breaking that her youngest child is having to go through this.
Well this card needs much improvement, but I want to encourage all of you to try new techniques. The only way to learn is to try things out. This card has multiple techniques.
 Click To Enlarge:
Materials:
1. Whisper White card stock: 5" x 3 3/4"; Cajun Craze card stock 8 1/2" x
5 1/2" scored and folded to form a 5 1/2" x 4 1/4" card base.
2. Inks: Bashful Blue, Tempting Turquoise, Old Olive, Cherry, Cajun Craze,
Chocolate Chip, VersaMarker(pen)
3. Stamp Set: Countryside, Plant Hope, Teeny Tiny Wishes
4. Other: Sponge, clear embossing powder, Aqua Painter, brayer
Steps:
1. Stamp truck on white card stock. Color the truck with Cajun Craze.Use
the aqua painter to pick up ink from Cajun Craze Stampin Write
marker. Use markers to color apples, their stems, bumper, etc
2. When you have finished coloring allow ink to dry and then coat all
of the truck image, except for the windows with VersaMark pen. Heat
emboss with clear embossing powder.
3. Brayer Bashful Blue ink on the top two thirds of the card. Whip ink
off of the truck.
4. Brayer Tempting Turquoise ink diagonally from the top left corner,
covering about two thirds of the horizontal space. Wipe ink off of
truck.
5. Apply Old Olive ink only to the grassy area on the truck stamp. Stamp
grass behind and in front of truck to form road.
6. Sponge bottom part of card with Old Olive to form grassy area.
7. Apply Old Olive ink to trees and stamp behind truck and along
horizon. Use Chocolate Chip marker to draw in in trunks of
trees.
8. Stamp sentiment in Chocolate Chipor Black on the bottom right
of panel. Center and attach it to Cajun Craze card base.
Below is a video I found on how to use your aqua painter and classic ink pads to watercolor. I thought some of you might enjoy it!
Well this card needs much improvement, but I want to encourage all of you to try new techniques. The only way to learn is to try things out. This card has multiple techniques.

Materials:
1. Whisper White card stock: 5" x 3 3/4"; Cajun Craze card stock 8 1/2" x
5 1/2" scored and folded to form a 5 1/2" x 4 1/4" card base.
2. Inks: Bashful Blue, Tempting Turquoise, Old Olive, Cherry, Cajun Craze,
Chocolate Chip, VersaMarker(pen)
3. Stamp Set: Countryside, Plant Hope, Teeny Tiny Wishes
4. Other: Sponge, clear embossing powder, Aqua Painter, brayer
Steps:
1. Stamp truck on white card stock. Color the truck with Cajun Craze.Use
the aqua painter to pick up ink from Cajun Craze Stampin Write
marker. Use markers to color apples, their stems, bumper, etc
2. When you have finished coloring allow ink to dry and then coat all
of the truck image, except for the windows with VersaMark pen. Heat
emboss with clear embossing powder.
3. Brayer Bashful Blue ink on the top two thirds of the card. Whip ink
off of the truck.
4. Brayer Tempting Turquoise ink diagonally from the top left corner,
covering about two thirds of the horizontal space. Wipe ink off of
truck.
5. Apply Old Olive ink only to the grassy area on the truck stamp. Stamp
grass behind and in front of truck to form road.
6. Sponge bottom part of card with Old Olive to form grassy area.
7. Apply Old Olive ink to trees and stamp behind truck and along
horizon. Use Chocolate Chip marker to draw in in trunks of
trees.
8. Stamp sentiment in Chocolate Chipor Black on the bottom right
of panel. Center and attach it to Cajun Craze card base.
Below is a video I found on how to use your aqua painter and classic ink pads to watercolor. I thought some of you might enjoy it!
Friday, February 25, 2011
Double Stamping
I saw a technique on line that I wanted to try. So, the card today is an experiment. I like it overall, but have decided if I use this techniques again I will use brighter colors. The card seems a little dark to me.
 Click To Enlarge
Materials:
1. Chocolate Chip cardstock(8 1/2" x 5 1/2", scored at 4 1/4") and a
scrap 2 1/" x 3/4"; Whisper White Card stock (5" x 3 3/4" and a 2"
x 3/4"scrap)
2. Inks: Crumb Cake, So Saffrom, Tempting Torquoise, Early Espresso
3. Punches:Word Window, Modern Label
4. Elements of Style and Teeny Tiny Wishes stamp sets
5. Snail Adhesive and Inl Applicator.
5. Stamps:
Steps:
1. Fold large piece of brown card stock to form at 5 1/2" x 41/4' card
base.
2. Randomly stamp floral pattern on white card stock, using Crumb Cake
ink.
3. Using an ink applicator lightly apply So Saffron, Crumb Cake and
Tempting Turquoise over floral images.
4. Load the floral stamp up with Early Espresso and stamp it diagonally
from the top left to the bottm right hand corner of the above panel.
(Refer to photo).
5. Punch out Word Window in white card stock. Sponge So Saffron and
Tempting Turquoise onto paper. Center and stamp sentiment of this piece
in Early Espresso.
6. Punch out Modern Label in Early Espresso card stock. Adhere above piece
to it. Attach resulting tag in the top right quadrant of the card.
7. Center and mount this panel onto the front of the brown card base,
Thursday, February 24, 2011
Just Believe I AM Thinking of You
Sometimes a card I make just makes me happy. This is one of them.
 Click to Enlarge
Materials:
1.Card Stock: Marina Mist ( 8 1/2" x 5 1/2" scored at 4 1/4", Other pieces - 2 1/4" x 3",);
Whisper White (5 1/4" x 4", 1 3/4" x2 3/8" and for inside 5 1/4" x 4")
2. Just Believe and Sincere Salutations stamp sets.
3. So Saffron ink pad and Stampin Write marker, Old Olive Stampin Write
Marker, Basic Black ink pad.
4. Sponge
Steps:
1. Fold large piece of Marina Mist to form a 5 1/2" x 4 1/4" card.
2. Color Just Believe stamp with So Saffron and Old Olive and stamp on the
bottom left of the larger white piece.
3. Sponge So Saffron ink around the edges of the above white panel.
Center and attach this piece to the front of the card.
4. Color smaller floral stamp with So Saffron and Old Olive Stampin Write
markers in the center of the smallest piece of white card stock.
Sponge So Saffron around the edges of this piece of paper. Center and
adhere to the smaller piece of Marina Mistl
5. Attach this panel to the right side of the larger whit panel. See
photo.
6. Stamp " Thinking of You" to the left of the small panel and above the
flowers stamped on the large white panel.
7. Stamp flower colored with markers on the right side of the remaining
piece of Whisper White card stock. Center and adhere to inside of card.
Wednesday, February 23, 2011
Cupcake Birthday Card
Whew! I am just not running fast enough! The days are really short since Wayne and I are on the road or at his treatment for 4 -4 1/2 hours everyday! It really makes me admire the women who are working at full time jobs and can still create and post a cards everyday. My hat is off to them!
The card below was designed for my church's Cards for Christ ministry. This group of women makes and sends cards to the ill, grieving and our shut-ins to assure them of our love and of God's. They are an amazing group of women and I am so blessed to be in their midst.
 Click To Enlarge
Materials:
1. Whisper White cardstock (cut at 5 1/2" x 8 1/2" and scored at 4 1/4",
3"x3", punched 1 1/4" circle; Pear Pizzaz (3 1/4" x 3 1/4",
4 1/4" x 1 3/8"), punched 1 3/8" scalloped circle; 4 1/4" x 1" Pear
Pizzaz DSP.
2. Crazy For Cupcakes and Teeny Tiny Wishes, stamp sets.
3. Melon Mambo, Pear Pizzaz, Bashful Blue and So Saffron classic ink pads.
4. 1 1/4" circle punch, 1 3/8" scallop punch.
5. Aqua Painter, snail adhesive
6. 6 1/2" Pear Pizzaz 1/4" grosgrain ribbon.
Steps:
1. Fold white card stock to from 5 1/2" x 4 1/4"card.
2. Center and adhere the Pear Pizzaz DSP on top of the Pear Pizzaz strip.
Glue this combined strip so that the bottpm edge is 1/4" from the
bottom of the card.
3. Stamp "happy birthbay" in the center of the white punched circle
and then attach it to the green scalloped circle. Glue this circle to
the center of the Pear Pizzazz strip.
4. Stamp stacked cupcakes onto the center of the 3" x 3" white square and
color with Aqua painter by picking up ink from the lid of ink pad.
(Remember to depress the lid to the ink pad before opening. That way
you will have the ink where it can be easily picked up with the Aqua Painter).
5. Adhere ribbon to the left side of the above piece.
6. Center and attach your focal image with the ribbon on the green square,
7. Center and attach this piece between the Pear Pizzazz strip and the
top of the card
The card below was designed for my church's Cards for Christ ministry. This group of women makes and sends cards to the ill, grieving and our shut-ins to assure them of our love and of God's. They are an amazing group of women and I am so blessed to be in their midst.

Materials:
1. Whisper White cardstock (cut at 5 1/2" x 8 1/2" and scored at 4 1/4",
3"x3", punched 1 1/4" circle; Pear Pizzaz (3 1/4" x 3 1/4",
4 1/4" x 1 3/8"), punched 1 3/8" scalloped circle; 4 1/4" x 1" Pear
Pizzaz DSP.
2. Crazy For Cupcakes and Teeny Tiny Wishes, stamp sets.
3. Melon Mambo, Pear Pizzaz, Bashful Blue and So Saffron classic ink pads.
4. 1 1/4" circle punch, 1 3/8" scallop punch.
5. Aqua Painter, snail adhesive
6. 6 1/2" Pear Pizzaz 1/4" grosgrain ribbon.
Steps:
1. Fold white card stock to from 5 1/2" x 4 1/4"card.
2. Center and adhere the Pear Pizzaz DSP on top of the Pear Pizzaz strip.
Glue this combined strip so that the bottpm edge is 1/4" from the
bottom of the card.
3. Stamp "happy birthbay" in the center of the white punched circle
and then attach it to the green scalloped circle. Glue this circle to
the center of the Pear Pizzazz strip.
4. Stamp stacked cupcakes onto the center of the 3" x 3" white square and
color with Aqua painter by picking up ink from the lid of ink pad.
(Remember to depress the lid to the ink pad before opening. That way
you will have the ink where it can be easily picked up with the Aqua Painter).
5. Adhere ribbon to the left side of the above piece.
6. Center and attach your focal image with the ribbon on the green square,
7. Center and attach this piece between the Pear Pizzazz strip and the
top of the card
Saturday, February 19, 2011
Stone Coaster
I love stamps. The more I use them the more uses I find for them.
Lately, one of my favorite things to do with them is to make coaster sets for my friends. They end up with a nice gift that is one of a kind, made just for them and is not too expensive. I have made coasters sets with the following stamp sets: Dream Gardens, Crosses of Hope, Make A Monster. The possibilities are endless! Whatever you do,HAVE FUN! Here is an example:
 Click To Enlarge
Materials:
1. Travertine tile squares. Found at such places as Home Depot, Lowes, etc.
2. An Aqua Painter
3. Classic ink pads: Certainly Celery and Pretty In Pink or with colors of your choice.
4. Piece of copy paper.
5. Spray sealer - glossy or matte.
6. Growing Green stamp set
7. Cork Sheet
8. Spray Adhesive.
Steps:
1. Wash and dry stones.
2. Stamp flower image in black on the stone tile and on a piece of thin paper such as the copy paper.
3. Cut the image out of the paper and position over the flower on the stone so that it is completely covered.
4. Stamp fern frond over flower and then remove the paper.
5. Depress the cover of the Pretty In Pink stamp pad and open. There will be droplets of ink on the lid.
6. Pick up this Pretty In Pink ink with an Aqua Painter and paint your flower.
7. Clean the Aqua Paint by rubbing the brush on the copy paper until there is no color.
8. Using Certainly Celery ink use the same technique to paint the fern frond.
9. Allow the ink to dry and then spray with your sealant. Be sure to do this in a well covered and ventilated area . I did mine outside.
10. Cut a piece of cork to cover the back side of the stone tile. Spray adhesive on the back of the stone and apply the cork.
There are numerous ways to color your images on stone. Don't be afraid to experiment. One hint: If you decide to use StazOn ink you will not need the sealant.
Lately, one of my favorite things to do with them is to make coaster sets for my friends. They end up with a nice gift that is one of a kind, made just for them and is not too expensive. I have made coasters sets with the following stamp sets: Dream Gardens, Crosses of Hope, Make A Monster. The possibilities are endless! Whatever you do,HAVE FUN! Here is an example:

Materials:
1. Travertine tile squares. Found at such places as Home Depot, Lowes, etc.
2. An Aqua Painter
3. Classic ink pads: Certainly Celery and Pretty In Pink or with colors of your choice.
4. Piece of copy paper.
5. Spray sealer - glossy or matte.
6. Growing Green stamp set
7. Cork Sheet
8. Spray Adhesive.
Steps:
1. Wash and dry stones.
2. Stamp flower image in black on the stone tile and on a piece of thin paper such as the copy paper.
3. Cut the image out of the paper and position over the flower on the stone so that it is completely covered.
4. Stamp fern frond over flower and then remove the paper.
5. Depress the cover of the Pretty In Pink stamp pad and open. There will be droplets of ink on the lid.
6. Pick up this Pretty In Pink ink with an Aqua Painter and paint your flower.
7. Clean the Aqua Paint by rubbing the brush on the copy paper until there is no color.
8. Using Certainly Celery ink use the same technique to paint the fern frond.
9. Allow the ink to dry and then spray with your sealant. Be sure to do this in a well covered and ventilated area . I did mine outside.
10. Cut a piece of cork to cover the back side of the stone tile. Spray adhesive on the back of the stone and apply the cork.
There are numerous ways to color your images on stone. Don't be afraid to experiment. One hint: If you decide to use StazOn ink you will not need the sealant.
Thursday, February 17, 2011
Dawn Flight
I really like this card. Partly, because my husband used to fly, everything from a Stearman to a jet. So, this card makes me a little nostalgic.
 Click To Enlarge
Materials:
1. Card Stock : Rich Razzleberry (8 1/2" x 5 1/2"), Basic Black (4" x 5 1/4"), Whisper White ( 3 3/4" x 5")
2. Inks: Basic Black, So Saffron, Melon Mambo, Tempting Turquoise, Not Quite Navy.
3. Stamp Sets: Plant Hope, Plane and Simple (current Mini Occasions Catalog)
4. Other: Brayer, sponge, Black Stampin Write Marker
Steps:
1. Fold Rich Razzleberry card stock to form 5 1/2" x 4 1/4" card.
2. Center and attach the Basic Black panel to the front of the card.
3. Brayer light coats of the followning inks, starting at the bottom and making your way to the top: So Saffron, Melon Mambo, Tempting Turquoise.
4. Brayer a light coat of Not Quite Navy in a diagonal direction from each top corner. Refer to above photo.
5. Stamp trees starting on the left and then stamp off moving towards the right. Reink and stamp just a little right of center. Before you stamp off again, wipe the in off of the trunks of the trees. Stamp and then draw thinner trunks with your StampinWrite Marker. Sponge black ink from the bottom edge of the paper to the bottom of the tree trunks.
6. Stamp plane above trees and color amolst solid with marker.
7. Center adhere inked panel on black cardstock.
Wednesday, February 16, 2011
Scrap Day Card
Well, today was the day to dig out all of those scraps and see if I could stick them together to make a card. I just couldn't do anything right. Everything was off center or stamped crooked. I had to keep adding layers to cover the mistakes up. But, I am not one to give up. So, here is my slightly askew card.
 Click To Enlarge
I am not going to try to list everything I used, but did want you to know that I used the level two hostess set Apple Blossoms. I used the stem, flower, and circle patterned background.
Dig your scraps out and see what you can make.
I would love to see what you come up with. If you have time e-mail a photo of them.
Tuesday, February 15, 2011
A Bird's Nature Walk
Some of you know that I am learning how to apply ink with a brayer. I just love the results I get. Even though I don't have the skill mastered yet and I need to learn a lot more about the color combinations, I just cannot stand to throw away my results. So here is another attempt.
 Click To Enlarge
Materials:
1. Card Stock: Not Quite Navy (4 1/16" x 3 1/8", 3 1/8" x 1/2"), Whisper White (4 15/16" x 3 15/16"), So Saffron (5 1/2" x 8 1/2")
2. Inks: So Saffron, Cajun Craze, Always Artichoke, Basic Black,BashfulBlue, VersaMark.
3. Stamp Sets: Vintage Vogue, Nature Walk (current Mini Occasions Catalog)
4. Punch:Dotted Scallop Ribbon Border
5. Other: Scoring Tool, clear embossing powder, More Mustard 3/16" brads,
heat tool, Watercolor Pencils blues and gold. Stampin' Write Markers.
Steps:
1. Fold So Safron card stock to form a 5 1/2" x 4 1/4" card. Score the front panel of this card every 1/2".
2. Color and stamp flower border with Cajun Craze, So Saffron, Akways Artichoke Stampin Write Markers. Allow ink to dry and then cover the image with embossing ink, using a VersaMark pen . Heat emboss with clear powder.
3. Stamp bird in Basic Black and then color with blue water color pencils. Color beak with a gold color.
4. Lightly brayer So Saffron ink over the bottom half of the card. Brayer Bashful Blue at the top part of the card.
5. Punch the small strip of Not Quite Navy card stock with Scallop Ribbon Punch and attach to the back of the left side of the larger Not Quite Navy piece, allowing only half of punched area to show.
6. Attach bird panel so that the left side is even with the left side of the original larger piece of Not Quite Navy panel.
7. Place 3 More Mustard brads through the right side of the navy panel as shown in the photo.
8. Center and attach panel to the front of the So Saffron card bas.
Monday, February 14, 2011
Sympathy Card
Life isn't always easy and one of its hardest parts is losing the ones we love. Family and friends of the deceased are left with so much heart pain. At these times it is so important for us to reach out to each other through actions, words and deeds. Sometimes a card can have great meaning, especially if it assures the recipient of God's love and His eternal presence.

Materials:
1. Cardstock- Very Vanilla( 5 1/2" x 8 1/2", 3" x 4", 3"x3"), Perfect Plum (4 1/2" x 3 1/2")
2. Ink: Perfect Plum, VersaMark
3. Punches: 2" x 1 3/8" Circle , Ticket corner small
4. Stamp Set: Thanks for Caring (current Occasions Mini Catalog)
5. Other: Basic Pearls, clear embossing powder, heat tool,Perfect Polka Dot, embossing folder, sponge dauber, dimensionals
Steps To Make:
1. Fold large piece of Very Vanilla to form a 5 1/2"x 4 1/4" card. Put the front panel in the embossing folder and run through the Big Shot.
2. On the center of the smaller piece of Very Vanilla stamp butterfly and flower with VersaMark ink and then heat emboss with clear embossing powder.
3. Die cut a 2 1/2" x 2" oval out of a piece of scratch paper. Save the oval to be used another day. Take the negative that is left and use it as a mask. Center and place it over the embossed images.
4. Sponge Perfect Plum ink over the stamped images and within the oval window. Buff off ink on images with a soft cloth or paper towel. Notch out the corner of the paper using the Ticket Punch.
5. Stamp "With Deepest Sympathy" with Perfect Plum ink on the smallest piece of Very Vanilla card stock and punch it out with the 2" oval punch. Use a sponge dauber to color edges of the oval with Perfect Plum ink.
6. Center and attach the above piece to the Perfect Plum card stock. Attach basic pearls to the top and bottom left of the Perfect Plum card stock as shown above.
7. Attach the Perfect Plum panel to center-left of the card base.
8. Using dimensionals attach the oval with the sentiment to the bottom right of the Perfectl Plum panel.
The next time I make this card I will have a slightly greater degree of separation between the butterfly and flower.
I hope of you have a wonderful Valentines Day and that you are surrounded by loved ones.
Friday, February 11, 2011
Faithbooking - Bountiful Blessings
I am finally finding time to do some scrapbooking. The page below is actually a form of faithbooking - at least according to my definition. I believe faithbooking is about sharing our love for God and just how wonderful He is. It also is a way to tell our families how much we love them and more importantly,how much God loves them. I want to tell them that for as long as they live and long after I'm gone. I hope that can be accomplised with the words and pages I leave behind.
 Click To Enlarge
I used Crumb Cake and Cajun Craze cardstock, the same color inks and the stamp set Season Of Friendship. I stamped the tree twice with a light coat of Crumb Cake ink to lengthen the tree. I then used the brown pencil from the Stampin'Up watercolor pencil to even out the truck area and darken the limbs. I then use the aqua painter to smooth things out.
I hope you have a wonderful day!
Wednesday, February 9, 2011
Framed Tulips Card
The new embossing folder Framed Tulips, found in the current Occasions Mini Catalog, is deceptive in that you might think the only thing you can do with it is emboss an outer border on your card, but take a second look. The card below is one example. I must admit I don't think this is my best effort, but I have other ideas which I will try later.

Click To Enlarge
Materials:
1. Card Ctock - Early Espresso (5 1/2" x 8 1/2"), Blushing Bride (4 1/8" x 1/2", 3" x 2"), Whisper White (2" x 3")
2. Ink: Soft Suede, Blushing Bride
3. Punch: 2" x 1 3/8" Oval
4. Other: Oval dye -2 5/16" x 1 1/2", Sponge Dauber, Dimensionals, Snail Adhesive
5. Embossing Folder- Framed Tulips
6. Stamp Set: Forest Friends
Instructions;
1. Fold Early Espresso to form a 5 1/2" x 4 1/4" card.
2. Place the front of the card in the embossing folder and run through the Big Shot.
3. Place the larger piece of Blushing Bride into the embossing folder so three of the edges are embossed. Then turn the paper so that the 4th side is embossed. Hint: Do not roll the paper all the way through the Big Shot. Move the plate forward just enough to emboss the edge. Then back it out.
4.Punch the white paper with the oval punch and then stamp the tree from Forest Friends with Blushing Bride ink in the center of the paper. Use the Soft Suede Stampin' Write marker to color the trunk and branches of the tree.
5. Apply Soft Suede ink to the edges of both ovals with a sponge dauber. Then lightly apply the ink to the top of the tuplips impressed on the rectangular piece of the Blushing Bride card stock. Use the sponge dauber.
6. Center and adhere the white oval to the Blushing Bride oval with dimensionals. Center and adhere the combined ovals to the Blushing Bride rectangle. Finally, center and adhere this strip to the front of the card.
Tuesday, February 8, 2011
Everyday, my goal is to learn something new that I can pass along to my friends and blog visitors. I am trying to learn how to get Stampin' Up videos on my page,today, particularly the one about the Bliss stamp set I like so much. That way their techniques and information can be passed along to you. I am about to make a computer click that will yield a video you can watch. However, those of you who receive my blog as an e-mail know I have made several unsuccessful attempts this morning. Keep your fingers crossed. Here it goes!
Bliss Bridal Shower Card
I am so glad that I got the sale.a.bration stamp set Bliss. It is so versatile. A few days ago I made a "thinking of you" card with it. Then, I needed a card for a bridal shower and, guess what, the bliss set was whipped out again. The card below is what I came up with this time.
 Click To Enlarge
Materials:
1.Card Stock: Whisper White ( 5 1/2" x 8 1/2" & 4 1/4" x 3 3/16"; Rich Razzleberry ( 4 3/8" x 3 3/8")
2. Ink: Perfect Plum, Rich Razzleberry, VersaMark
3. Ribbon - Rich Razzleberry two 5" pieces.
4. Other - Tissue Paper, Anywhere Glue Stick, Clear Embossing Powder, Heat Tool.
Below are the steps taken to make the card.
1. Fold the large piece of white card stock to form a 5 1/2" x 4 1/4" card.
2. Starting at the outside edge score the front face of the card at 1/8", 1/4", 3/8". Repeat this scoring pattern on each side of the card.
3. In the center of the small piece of white paper stamp the word Bliss with Perfect Plum ink. Then use the Perfect Plum Stampin' Write marker to fill in each letter with solid color. After it dries coat the image with ink from a VersaMark pen and then heat emboss with clear embossing powder.
4. Ink up the large flourish with Perfect Plum ink and stamp the image so that it is centered over the word Bliss. Allow ink to dry.
5. Take a piece of tissue paper measuring about 5" x 5" and wad it up.
Flatten it back out. Apply glue to the panel with the stamped image.
Then spread the tissue over it. Trim off excess tissue.
6. Attach the ribbon to the top and the bottom of the tissue covered panel.
7. Center and adhere this panel to the Rich Razzleberry panel. Now attach this layered panel in the center of the scored lines.
Monday, February 7, 2011
New Friends
I love having people out to scrapbook at my home in the country. The house has an enclosed sunroom that I use as my scrapbook studio. This is where I normally teach my classes, have stamp camps, scrapbooking, faithbooking, etc. However, since my beloved is going through radiation treaments I cannot schedule regular classes. However, I do invite those in the community to come on extremely short notice. Today was one of those days. I just wanted you to have a chance to meet some of my new friends

I love having multiple generations in a family come and scrapbook or work on cards or other projects. Hope and her mom, Susan, are not the first mom and daughter team to come out, but they are my newest. I am so blessed to have had a chance to meet them.
I had four other wonderful young women who also came. They are all sisters of the Latter Day Saints. How I admire them for setting time aside to serve as missionaries. I met Sister Welch while we were both volunteering at our town's Angel Food Ministry and now I have three new friends! AH- what a great life!

Hello Baby Card
Be sure to check out Stampin'Up's lastest promotion - the sale.a.bration! For evey $50 you spend you can select a stamp set from the sale.a.braton catalog or one from selected sets found in the "Idea Book & Catalog".
Below is a card I made with Forest Friends stamp set, which I got for free as a result of the sale.a.bration. I am trying to learn how to use the brayer to apply ink and this is my first attempt.
 Click To Enlarge
Materials:
1. Cardstock: Bashful Blue (5 1/2" x 8 1/2"), plus small scrap. Real Red (5 1/4" x 4")plus small scrap, Whisper White 5" x 3 3/4".
2. Ink: Bashful Blue, Real Red, Certainly Celery, Always Artichoke, Soft Suede, More Mustard, Concord Crush, Not Quite Navy, Basic Black, VersaMark.
3. Punches: 1 1/4" and 1 3/8" Circle .
4. Stamp Sets: Forest Friends, So Happy for You, Teeny Tiny Wishes, Silhouette Sentiments
5. Other: Clear Embossing Powdeer and heat tool
The steps to make this are:
1. Fold the Bashful Blue card stock to form a 5 1/2" x 4 1/4" card.
2. Center and adhere red panel.
3. Stamp bunny( Soft Seuede) onto white card stock and heat emboss with clear emcossing powder. Then color the white areas of the bunny with a VersaMark pen and emboss it with the clear embossing powder.
4. Use Stampin' Write makers to color the tree stamp (Soft Suede, Always Artichoke) and the butterfly (Real Red, Basic Black). After allowing them to dry coat with VersaMark using the pen again. Heat emboss with the clear powder.
5. Tear a piece of copy paper to form a mask to make the green hill. Brayer Certainly Celery on the bottom of the card, making sure that the bottom of the mask is right under the tree trunk. Lightly rub all ink off the bunny.
6. Turn the mask over to cover you green hill and brayer the rest of the card with Bashful Blue. Then lightly brayer Not Quite Navy on the upper corners. Lightly buff ink off of the tree and bunny.
7.Stamp flowers on green hill in Real Red, Concord Crush, and More Mustard.
Use songe to darken parts of the hill with Always Artichoke..
8. Punch 1 3/8" circle in Real Red and 1 1/4" circle in Bashful Blue.
Stamp sentiment in Not Quite Navy on the blue circle. Adhere circles together and use dimensional to attach them to the card.
Below is a card I made with Forest Friends stamp set, which I got for free as a result of the sale.a.bration. I am trying to learn how to use the brayer to apply ink and this is my first attempt.

Materials:
1. Cardstock: Bashful Blue (5 1/2" x 8 1/2"), plus small scrap. Real Red (5 1/4" x 4")plus small scrap, Whisper White 5" x 3 3/4".
2. Ink: Bashful Blue, Real Red, Certainly Celery, Always Artichoke, Soft Suede, More Mustard, Concord Crush, Not Quite Navy, Basic Black, VersaMark.
3. Punches: 1 1/4" and 1 3/8" Circle .
4. Stamp Sets: Forest Friends, So Happy for You, Teeny Tiny Wishes, Silhouette Sentiments
5. Other: Clear Embossing Powdeer and heat tool
The steps to make this are:
1. Fold the Bashful Blue card stock to form a 5 1/2" x 4 1/4" card.
2. Center and adhere red panel.
3. Stamp bunny( Soft Seuede) onto white card stock and heat emboss with clear emcossing powder. Then color the white areas of the bunny with a VersaMark pen and emboss it with the clear embossing powder.
4. Use Stampin' Write makers to color the tree stamp (Soft Suede, Always Artichoke) and the butterfly (Real Red, Basic Black). After allowing them to dry coat with VersaMark using the pen again. Heat emboss with the clear powder.
5. Tear a piece of copy paper to form a mask to make the green hill. Brayer Certainly Celery on the bottom of the card, making sure that the bottom of the mask is right under the tree trunk. Lightly rub all ink off the bunny.
6. Turn the mask over to cover you green hill and brayer the rest of the card with Bashful Blue. Then lightly brayer Not Quite Navy on the upper corners. Lightly buff ink off of the tree and bunny.
7.Stamp flowers on green hill in Real Red, Concord Crush, and More Mustard.
Use songe to darken parts of the hill with Always Artichoke..
8. Punch 1 3/8" circle in Real Red and 1 1/4" circle in Bashful Blue.
Stamp sentiment in Not Quite Navy on the blue circle. Adhere circles together and use dimensional to attach them to the card.
Saturday, February 5, 2011
Bliss Thinking of You
Here is another card using a Sale.A.Bration stamp set called Bliss. I really liked the way this one turned out.
 Click To Enlarge
Materials: Card Stock Pear Pizzazz (5 1/2" x 8 1/2"), Blushing Bride (5" x 3 3/4"), Whisper White (1 3/4" x 4 5/8") In Color Pear Pizzaz DSP (1 5/8" x 4 5/8"), plus a small piece of Whisper White, which will be used to stamp and clear emboss 2 butterflies ans 5 flowers.
Ink: Basic Black, Blushing Bride, Melon Mambo, and VersaMark.
Other: Basic Pearls, clear embossing powder, heat tool.
Stamp Sets: Bliss from sale.a.bration catalogue and Sincere Salutaions from Idea Book and Catalog.
Once you have gathered you tools, all you have to do is:
l. Fold Pear Pizzazz to form an 5 1/2" x 4 1/4" card base.
2. Center and adhere pink card stock to the front of the green card.
3. Attach DSP at the top of the pink paper leaving an even pink border.
4. Load "Thinking of You" stamp with VersaMark and then black ink and stamp onto the right side of the 1 3/4" x4 5/8" white paper. Clear emboss.
Then stamp flowers in a random pattern partially around the sentiment. Attach to the the bottom of the pink paper,leaving an even border
3. Load up 1 butterfly and 5 flowers with VersaMark and then Blushing Bride. Stamp onto the scrap of white paper. Clear emboss. Load up the butterfy stamp a second time, using VersaMark and Melon Mambo. Stamp onto a scrap of white paper. Clear emboss.
4. Cut out the 5 flowers and 2 butterflies. Add pearls to make the butterflies' bodies. Attach pieces to card as show in the above photo..
Monday, January 31, 2011
Dream Garden Friendship Card
Last week my husband and I ate at the Golden Wok. We were seated right by a painting of a silhouette of an oriental women with bold streaks of color begind her. It inspired the card below.

This was a really quick and easy card. The base layer was made of Pretty In Pink cardstock cut 5 1/2"X 8 1/2" and folded in half. 1/4" of vertical side of the card front was cut off and then punched with the Scallop Edge Border Punch. The second layer was made of a 3 1/2" x 4 1/2"piece of Basic Black card stock, which was also punched on the right side with the border punch. The piece was centered on the front panel and adhered. The third layer was made from a 3"x 3" piece of Whisper Whitecardstock, which was stamped with the Giesha girl stamp from theDream Gardens stamp set using VersaMark and black ink and then clear embossed. Pretty in Pink, Certainly Celery, and Bashful Blue inks were sponged across the 3" x3" square. This was then glued onto the black layer. A piece ofBasic Black card stock was cut 5 1/2" x 1 " and punched with the above border punch. This piece was glued to the right inside panel on the outer edge
I hope this makes sense, but if it doesn't, just e-mail me.
Subscribe to:
Comments (Atom)